Migrating our Videos from YouTube to Rumble

The complaint we get here every day is that you have to log into YouTube to view our videos. YouTube is anti gun and restricts most all firearms videos. We fall into that category and are punished accordingly.

A new video platform, Rumble, has welcomed the firearms community with open arms with one caveat, you sometimes have to watch a commercial. After a few seconds a Skip Ad button comes up and you can click it and go straight to our video.

I know there will be detractors saying we switched to make more money, which is not the case. We are paid fractions of a cent on every view. We switched so there would be no need to register and belong to a video host to watch our videos. It is for the convenience of our customers.

I have started a NEW Rumble Channel “Pistolsmithing with Jack Weigand” where I will soon be posting informational videos on all phases of Pistolsmithing. I will be looking at the mechanical side and the business side so please stay tuned for that. The following is a link to the new channel https://rumble.com/c/c-4798785

Post Covid 19 Updates August 3 2022

I do hope everyone is doing well after the Pandemic. As you well know things have changed due to the Pandemic and we are no exception to that. Here are some quick updates from here.

We no longer have full time sales staff. If you have been trying to call we have very limited phone hours. Generally we answer the phone from 11 AM to 2 PM EST Monday through Thursday. We do the best we can. The best way, today, to communicate with us is through email. Please use the following format for the best results. I generally answer email questions evenings and weekends. I know what it is like to be stranded trying to get something installed so I try to be avaliable.

Sales Help: Send us an email with the following information.
The Manufacturer of your firearm:
The EXACT and correct model of your firearm:
The caliber of your firearm:
Barrel length for handguns:
Photos are always a great help:
What mount is it you are asking about:

Technical Help: Send us an email and photo of the issue with the following information.
The Manufacturer of your firearm:
The EXACT and correct model of your firearm:
The caliber of your firearm:
Barrel length for handguns:
The exact Weigand part number you are asking about:
The issue you are experiencing:

Random suggestions:
Screws Come Loose: If you have a screw or screws come loose, please refer to my many blog posts on thread locker and how to apply it correctly. It is simply a thread locker issue not a scope mount or screw issue. Our scope mount designs are mature and well evolved and we have a minimal amount of legitimate issues.

Purchasing the Correct Parts: Please do your research before making a purchase. Our return and exchange policy’s will cost you time and money so do your homework before purchasing.
When assisting you making a purchase remember we are working with the information you give us. We know our products in and out and can get you the correct part the first time if you give us the correct information. We are also not responsible for you getting the incorrect part if we help you choose, we just go by the information you give us.

Returns and Why There is a 20% Charge
(exchanges there is no fee just return shipping)

We accept and retrieve your order from our shopping cart
It is individually processed and the credit card transaction done
We get charged for each transaction
Your order is printed
We then have to purchase shipping for that order
A shipping label is printed
The order is now picked packed and sent to shipping (some supplies cost involved)
Your order is picked up by the shipper and you are sent tracking information

If you RETURN the order (not exchange)
You have to call us for an RA#, phone time generally
We then have to receive the order and look up all of the paperwork
We have to open and inspect the parts for damage
Generally some or all of the packaging is unusable so we have to replace it.
We have to process your order as a return
We have to do a credit to your account which there is a transaction fee
All the products have to be returned to stock.

There are quite a few steps in this process and the lowest paid person here is paid $20 per hour. The 20% return fee is there to cover some of the above costs.

Small business, especially a small American manufacturer, is no longer an easy business to run. We are struggling to survive just like every other business owner today so we ask for a little grace in this area.

We thank you for using our products and we are always here to help you with any issues or questions

What is the most important component in applying thread locker?

First things first, all of our scope mount screws require thread locker to keep them tight. Due to the vibration most screws will come loose if thread locker is not applied properly. There are many amateurs out there that say thread locker is not necessary, they are wrong.

The most important component of applying thread locker? The screw threads and the threaded hole they are being screwed into must be thoroughly cleaned and degreased. If there is any oil residue on the threads the thread locker will not adhere to the threads and the screw will come loose. If you have a screw come loose it is because the thread locking procedure was not done correctly. Here is the correct procedure in thread locking screws.

CLEAN SCREWS AND INTERNALLY THREADED HOLES WITH AEROSOL CARBURETOR OR BRAKE CLEANER

Spray clean each screw and each threaded hole with the aerosol burst. This will generally clean any oil and remove debris. I get emails with people telling me they used alcohol to clean their parts but the screws still came loose. That is correct, alcohol is not a great degreaser and generally does not come in an aerosol can. The degreasing and washing action is what we are looking for.

BLOW OFF THE SCREW THREADS AND THREADED HOLES WITH COMPRESSED AIR

Using compressed air blow dry each screw and threaded hole. This removes the solvent and any remaining debris. This gives the thread lock a clean oil free surface to bond to so the screws can’t come loose.

APPLY THREAD LOCKER TO THE SCREW AND THREADED HOLE

I apply a dab of thread locker to the say the first 4 threads of the screw and a dab in the threaded hole. This gives you a better chance of 100% thread to thread locker contact which creates a tighter bond. Always remove excess thread locker from around the holes. As a side note we recommend Blue, service removable or small part thread locker. This does not require heat to remove the screws.

TIGHTEN AND OR TORQUE THE SCREWS DOWN

Using a quality Allen or TORX wrench tighten the screws down as necessary and allow the thread locker to cure for a few hours.

If you have a screw come loose you have missed one of the above steps, it is not the scope mounts fault. After 30 some odd years of designing, manufacturing and installing our mounts and rings a properly thread locked screw will not come loose.

We are here to help but, don’t be impolite

We are here to help you with installation issues with our parts, we love helping. Generally we see the issue is the wrong part has been ordered, the installation video has not been watched and the instructions have not been read CAREFULLY. All of this is fine, we get it. What I have been seeing is an increase in people just starting out with a bad attitude and feeling they know more than we do. Trust me, after 30+ years of designing and manufacturing scope mounts and tools I know the products inside out and most all of the applications. If I am giving you advice you can bet I am usually correct.

If you call us and are ignorant or impolite to my employees they are instructed to tell you to hold for me. If that happens, I would hang up if I were you, it is not going to go well for you at all. My employees are my family and I am very protective of my family. There is no need to mistreat my family because you are having difficulty installing one of our products. Take a breath, relax and know we are going to help you. We are going to make everything OK.

Here is what I see most every week as issues people have and the cure.

Ordering the wrong mount. This is the biggest issue I see. Take care to read all of the information on each product pages. If you have a moment watch the installation video. If after that you are unsure of what to part order send us an email and a photo of your firearm. Firearm models, names and types can be confusing but we can help.

Using NON USA made Allen Wrenches. Allen type wrenches made other that here are not usable when working on firearms. Our screws are USA made and very close tolerance. If your Allen wrench fits too loose then get good wrenches. We have a kit for $5, made in the USA. The second issue is not inserting the wrench all the way in the head. When we get stripped screws back they are always stripped half way into the head where the wrench was not inserted all the way in. Take your time and get the wrench all the way in.

Not degreasing the screws and threaded holes and applying thread locker incorrectly. If you have screws come loose this is what caused it. Screws on our products will not come loose if you degrease correctly and apply the thread locker correctly. Spray the screws and threaded holes with carburetor or brake cleaner. Blow the threads off and the holes out with compressed air. If there is oil or grease on the threads there is a good chance the thread locker will not cure correctly. Then add thread locker to the screw threads and the threaded hole and allow to dry. Good to go.

Over the past few years I have personally examined every return we have gotten. 95% of all of our return are not an issue with our products but generally installation issues. Our products evolve from customer input and any legitimate issues we find. We constantly tweek our products trying to make them the best possible products we can.

If you encounter an issue please do the following.

Send us an informative email with all of the facts. Your firearm make and model, caliber, the part number on the part you received from us and a photo of your firearm and the fitment or installation issue. Email it to the email on our contact page. We will get back to you with help as soon as possible.

We thank you for using our products and we are always here to help you with any issues.

Watch our YouTube videos for WEIG-A-TINNY® Scope Mount Installation help

If you have ever wondered how our scope mounts install, try our YouTube video library.

You can find the videos at the following link
https://www.youtube.com/user/JackWeigand/videos

I am currently working on dozens of new, more specif, videos. The videos posted now are very general but give you a solid idea of how to install our scope mounts. Some mounts are confusing to look at off of the firearm. In the videos we show you how they look correctly mounted on your favorite rifle pistol or revolver.

Generally when someone is having trouble mounting one of our products they either didn’t know we had videos or just did not watch them. If we have a video for the product you are looking at you will find it on the product page next to the YouTube icon.  Small YouTube Image

As always if you have questions please feel free to call us at 570-868-8358 Monday through Friday 9am to 4pm, or email us at sales@jackweigand.com

RUGER® Revolver Model Names Explained

We have been encountering quite a few issues with customers getting many of the RUGER® Revolver names confused, and they can be confusing. I am going to post photos and give the correct name and a little overview of the revolver. In searching for photos on Google I found quite a few incorrectly labeled photos.

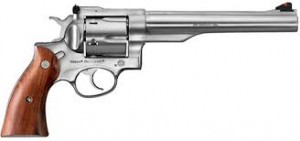
Ruger Redhawk Hunter  RUGER® Redhawk® Hunter® Model

The Redhawk® is a double action revolver and is very popular in .44 Magnum caliber. What makes this a Hunter®  model Redhawk® are the two semi circles you see cut into the top of the barrel just in front of the receiver. This accommodates the RUGER® style rings for scope mounting. This also allows us to mount our RRHNGS/B scope mount to the barrel so you can attach Weaver Picatinny or WEIG-A-TINNY® style attachments.

Ruger Redhawk  RUGER® Redhawk®

The very same revolver as the above minus the Hunter® scope ring attaching points on the barrel. We have two scope mounts for this model.
Our non drill and tap RRH75NDS/B scope mount, it attaches to the receiver and barrel so you can attach Weaver Picatinny or WEIG-A-TINNY® style attachments.
And our drill and tap RASWMS/B scope mount that attaches only to the receiver.

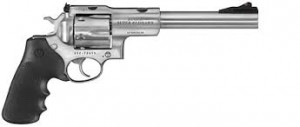
Ruger Super Redhawk  RUGER® Super Redhawk®

This is also a double action revolver very popular in the .44 Magnum, 454 Casull and .460 Ruger calibers. You can see the big difference is that the RUGER® ring cuts are located on the receiver and not the barrel.
We offer two different scope mounts for this revolver depending on caliber.
Our SRH+ scope mount is for the .44 Magnum caliber only and does not require removal of the rear sight.
Our SRH454 scope mount can be found on the same page and is used with the heavier recoiling 454 Casull and .460 Ruger calibers.

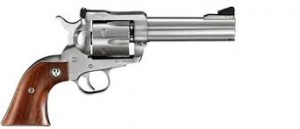
Ruger Blackhawk  RUGER® Blackhawk®

This is a single action revolver and is also very popular in .44 Magnum and comes in other various calibers.
Our RASWMS/B scope mount is currently our only offering for this revolver and requires drilling and tapping two 6-48 holes. The mount also utilizes the existing rear sight elevation screw hole for attachment.

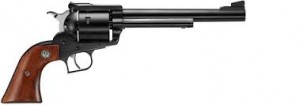
Ruger Super Blackhawk RUGER® Super Blackhawk®

This revolver is very similar to the standard Blackhawk®, in short it has been made a little stronger to handle larger calibers. There are other subtle differences but for scope mounting purposes is much the same as the Blackhawk®.
Our RASWMS/B scope mount is currently our only offering for this revolver and requires drilling and tapping two 6-48 holes. The mount also utilizes the existing rear sight elevation screw hole for attachment.

Ruger Super Blackhawk Hunter  RUGER® Super Blackhawk® Hunter®

Very much the same revolver as above with the exception of the RUGER® scope ring mounting points making it a Hunter® model. One other interesting feature is the removable front sight.
Our RRHNGS/B scope mount is our most popular offering for this model.
Our RASWMS/B scope mount will work and should be used when heavy recoiling ammunition will be the norm. Drilling and tapping is always the most solid solution for scope mounting.

I hope this goes a little way in clearing up some of the model designations RUGER® uses to identify a few of their revolver offerings. As always if you have questions please feel free to contact us via email or phone. We are always glad to help.

No Drill and Tap VS No Gunsmithing

We don’t manufacture No Gunsmithing scope mounts but we do manufacture a lot of no drill and tap scope mounts. In my opinion all scope mounts require a good gunsmith to install them. I talk to hundreds of people a week and I can generally tell in a minute or so if you should be installing your own scope mount. Lets face it, some people are just not mechanically inclined. Just like you would not want me presenting the closing argument at your trial, not in my gifting package.

I suggest that everyone find a competent gunsmith and have he or she install your scope mount. If you feel you have the mechanical abilities then go for it. I do suggest that anyone installing one of our mounts read the instructions and check out our growing You Tube library of videos.

Lots of little issues crop up installing any scope mount. The most common I hear is the screws are too long. If you can not shorten a screw you should not really be installing a scope mount. Top straps on revolvers in particular vary in thickness. We always try to design our mounts and screws so that there are no exposed threads on the bottom of the top strap. What happens is these recesses collect led and gunpowder residue and can actually affect the function of the revolver, sometimes creating drag on the cylinder. This is why we keep the screws as long as possible and can some times stick out a thread or two.

My point in all of this is that guns vary widely dimension wise so be prepared to do a little gunsmithing when installing any scope mount. No drill and tap does not necessarily mean no gunsmithing.

Proper Allen or Hex Head Screw Tightening

Something I see at the shop quite often is rounded out Hex head screws. Customers will return scope mounts claiming they received defective screws. We use only screws made in the USA to strict Allen manufacturers product specifications. We are a VERY small shop and I personally examine every return we receive. We have a very minute rate of return and generally the returns are screw related.

I use a 10X loop (magnifying glass) to look inside of the hex cavity to determine why the hex failed. The overwhelming reason for failure is installers do not get the Allen wrench inserted in all the way to the bottom of the cavity. When you look into the ruined screw cavity you will see it is rounded out only half the way down with the lower portion of the hex intact. The smaller the key size the more sensitive the screws are to rounding out. When inserting the key take your time and make sure the key bottoms out in the bottom of the cavity. The key then has a full purchase on the entire hex pocket and generally will never round out. Even over tightening the screws will not round them out if you bottom the key in the cavity.

The second biggest problem is cheap hex keys. You will find in our instructions we suggest using only Allen brand keys. In good USA made screws an Allen brand key will fit very snug. The off brand made in China hex keys are generally loose fitting and have a way better chance of rounding out the screw cavity.

In 30+ years of installing our mounts I have never once rounded out and Allen screw during installation. Sometimes removing a thread locked screw can be a different story but that is for another post.

The key to successfully installing a Allen or hex head screw is

1)     Use only Allen brand hex keys. You can find them HERE, at the bottom of the page, on our web site

2)     Always bottom the key in the hex cavity in the screw.

You can view our entire line of scope mounts the the following link

Weigand Scope Mounts

One Method For Sighting In a Scope or Dot Sight

I say one method because there are many methods used in sighting in procedures. I see this topic debated constantly in forums and it can be a very heated discussion. What I am posing is a very simple method to get you up and running quickly.

Of course we start with everything correctly installed. You can use this method for pistol, revolver, rifle or whatever. I start with a target at 10 yards. I know it is very close but it gives you an easy place to start . I will generally lay my firearm across my shooting bag or sand bag if you have one, for stability and support. It is hard to get sighted in if you are not steady.

I use a small 2″ diameter black dot, on a 2′ x 2′ piece of cardboard. I generally draw the dot on the cardboard with a sharpie. If you have a target that is the grid style, 1″ or 1/2″ square blocks, all the better. Fire one shot, if you are in the center of the dot you can read the next paragraph. If not here is what I do. Lets say I am 1/2″ left and 1″ low. Because we are close it will take quite a few clicks to see movement in shot placement. In this case, from experience I would move the windage (left and right adjustment) 4 clicks right. Because the elevation (up and down adjustment) was twice as far off as the windage I would move the elevation 8 clicks up. Aiming at the same point you initially shot at fire another round. If you need to move it more or less by all means move it again. You can tell by the point of impact movement if you have gone in the correct direction. This is a little trial and error, just take your time and observe your results. OK for our example that did the trick and you have a center hit.  Move your target to 20 yards and repeat. I keep doubling the distance until I reach my desired sighting in distance.

Here is the confusing thing about scope adjustment clicks and point of impact movement.  A lot of scopes and dot sight have the following system of clicks, not all but many do.

At 100 yards 1 click moves the point of impact 1/4″. So if we fired a shot and it was 1/4″ left one click to the right would center the shot. Here is where the confusion comes in. If we now fire the same gun at 50 yards 1 click now represents 1/8″ of point of impact movement instead of the 1/4″ we got at 100 yards. The following is a visual of this concept.

Line 2 targets up, each center in line with the other, one target is at 100 yards the other is at 50 yards. We fire a shot through both targets. If the target at 50 yards has a hole 1/2″ to the left then the target at 100 yards is going to have a hole 1″ to the left. You need to look at it like an angle. Not to confuse things but that is 1 MOA or Minute of Angle. A 1″ deviation of impact at 100 yards is 1 MOA. So when we move the point of impact at 100 yards 1″ it is only moving 1/2″ at 50. Dang I hope that is clear, HA HA!

You need to keep this in mind as you are progressing farther out using my method of sighting in. Each click will represent more movement as you move farther out.

Final distance for sighting in. This will vary for everyone. If you shoot only at 50 yards then zero your gun in at 50 yards. If you shoot at 100 yards then zero your gun for 100 yards, it is really that simple. If you know your zero at a fixed distance, you know your ammunition’s velocity, you can calculate your point of impact at varying distances very easily using ballistic tables. We will save that for another post.

If this is unclear please feel free to drop me a line. I may need to clean this up to make it more understandable for everyone. It seems easy to me but I have been doing it for a long time and I may be omitting some very important points. Feel free to let me know.


 

Scope Mount Screw Torque?

Scope Mounting Screw Torque

This is a hot topic today. I will give you what I have learned over the past 30 years of doing this for a living. It is not all that hard, the screws need to be tightened, not over tightened, enough so the mount is not loose and the screws will not loosen up. I do use thread lock on ALL scope mount and ring screws. I use small screw, service removable thread locker. It is generally pink or a milky red or purple in color. Please see my Thread Locker post for more details.

Here are the most important things to remember when torquing screws.

We use screws made in the USA. Purchase only ALLEN® brand Allen wrenches. Inferior brand wrenches fit loose in the screws and will lead to rounding out the head.

When you insert the wrench into the screw head make sure it bottoms out. If you only insert the wrench in say half way, that will also lead to rounding out the head. We see screw heads rounded out and upon examination with a 20X magnifying glass it is obvious most of the time the wrench was only inserted part way.

When torquing screws with a Torque wrench to a particular specification there are many variables. I have looked over at lest 20 torque specification charts and even most of them don’t agree on specs. There are also different specifications for dry or lubricated screws. For our purposes we are going to consider the thread locker on the screw to be a lubricant. Here are the specs we suggest using.

6-32 9 inch pounds
6-40 11 inch pounds
6-48 13 inch pounds
8-32 18 inch pounds
8-36 20 inch pounds
8-40 22 inch pounds

I know this can all be debated until the cows come home but you can’t go to far wrong using the above specifications. I suggest checking the torque after your first trip to the range. If you have done everything correctly all the screws should be set at the same torque you originally applied.

Old School
Many of you know I am an old timer. I have been using the following method of tightening scope mount screws since I started in business. I can say I have never had a failure using this method.

Using a short arm ALLEN® wrench I snug the screws down. We all know what snug is. I use one finger at the tip of the wrench and tighten it lightly. I then turn the wrench another 1/8 of a turn. We did an experiment at the shop and found that is pretty consistently 20 inch pounds of torque with me doing it. I am sure it varies with different people tightening the screws but it should get you pretty close.

All in all I don’t believe it is anything to get uptight about. It is pretty straight forward. Torque wrenches are great and provide consistency but I don’t believe you can’t mount a scope mount without one. It has been being done for over 100 year without Torque wrenches with great success.